|
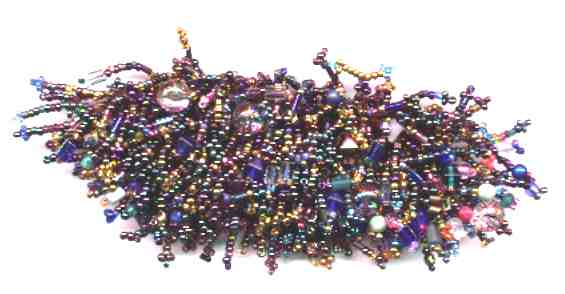
I began making barrettes and have fallen in love creating them. I've found barrettes can serve two purposes: 1. keeping hair in place and 2. adorn your hair. Barrettes are very attractive in shorter hair styles as well.
One tip for hair with a thin texture: use thin foam pads between the hair and barrette clip. This will give the barrette more to 'hold' onto and stay in place.
Ideas are like building blocks that bring everyone a little higher with each new idea from the last. So enjoy my building block and let me know how it goes for you! sturnfield@juno.com
Teresa
Supplies:
1. Seed beads or Delicas for the base of the Barrette. This base won't be seen so I use what I have the most of. Basic dark colors are a good choice. I also use from my own 'bead soup.' These are beads used in other projects that were mixed together and I don't want to separate them. For size 11 seed beads, I start with 14 beads across and I bead about 24 rows. And for Delicas I use . Since bead sizes vary, I will compare my beaded base with the barrette clip I'll be using. I will hold the base against the barrette clip to adjust the number of rows that I'll bead. I'm more of a free-form beader anyway so I rarely count. I did count for this tutorial for those beaders more comfortable with numbers than 'eyeing it.' length. I use a spring clip barrette for the 3" Party Barrette as the beadwork becomes heavy and you'll need a strong support for your beadwork. If you want to create a smaller barrette or a set of two small barrettes, adjust the length and width of your peyote base to your clips. For the smaller barrette, your beadwork will be lighter and a clip barrette will work.
2. Lots of different color beads and smaller embellishment beads, bugles are good, nibblettes and cubes. If you have a couple of bowls of beads that need sorting use these! You may want to choose a overall color, so lean towards that choice. I'm prone to blue but I've had orders that wanted a predominant color of pink or royal type colors: gold, purple, deep blue etc. The beads at the end of the fringe will define the overall color the most.
3. Needle, thread of your choice, wax
 Spring
Barrette Spring
Barrette |
4. My directions will cover a 3" barrette. If you want a longer barrette just bead your peyote base longer to cover your barrette blank. And for a smaller clip, you'll bead a smaller base. You will adjust your beadwork according to the size of your barrette clip. Feel free to send a question to me. sturnfield@juno.com
To begin beading:
1. Thread your needle and tie on a stop bead. For a 3" Barrette pick up 16 beads size 11 Seed Beads You must have a even number. For Delicas pick up 20.
2. Continue weaving till you have a flat strip that covers the barrette blank and overhangs about a 1/8th inch on both ends. This will be about 96 rows with Size 11 Seed beads and about 108 rows with Delicas.
3. Now this is the fun part!
Bring your needle and thread weaving through the beads to anchor it now bring it through
the next to the last beads at one corner. This is up to you on how you prefer to
work right to left or left to right. Place beads on your thread about 1 1/2'' long
now you may end with a embellishment bead and anchor with a small bead or a 3 bead picot .
| You may also may make stick fringe or |  |
| twisted fringe. |  |
Actually the more varied fringe, embellishment beads and finishing touches the better.
| Once you bead across your peyote base, move one row down and go across again, and do it again till you reach about 3/4 th to the bottom of your base. Basically go fringe crazy.. As you work make sure the fringed areas are full and thick. If they're not, you may return and add more fringe. Keep the lengths of the fringe fairly uniform through out the beadwork. | 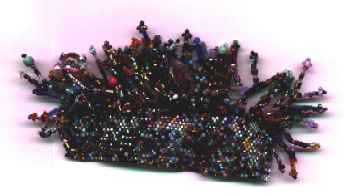 |
5. To complete the Barrette pull out your 3" spring barrette
blank. You can buy these in bulk but if you are not sure you want to make 100
barrettes then shop at Wal-Mart in the Craft area for small packs. You will need a
backing material, and
I use ultrasuede. This can be purchased from Fabric stores or you can order on-line
at Ultra Scrap or at the Fabric Club. Ultrasuede makes a wonderful
backing for Cabochons too. Cut a strip of ultrasued to cover the bottom of the
beaded piece.
6. So now it's time to glue. I like E-6000 adhesive. First, do a final check to make sure you are satisfied with what you've created and beaded. Once I finish the beadwork I wait 24 hours and look at it again, making sure it's really done. So if you're sure
| 7. Apply adhesive to ultrasuede and place on back of your beadwork, smooth out fully and make sure there are no wrinkles! Allow the piece to dry for 12 to 24 hours. | |
| Now (12-24 hours later if you're patient) Take the spring clip out of the barrette by pushing it uptoward the center of the barrette frame. Set aside in a safe place.(your toddler may decide it looks like a great lego weapon) apply adhesive directly to the barrette blank strip. | 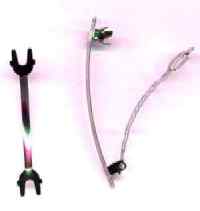 |
| Make sure you re putting the beadwork in the direction you want it
to lay when you are wearing the barrette. Decide this before you apply the
adhesive. Now apply beadwork to base of barrette. Let this dry.
Once this is dry, you will need to turn the barrette over (beadwork facing down). You need to cut a piece that will cover the inner area of the barrette. This gives the barrette a finished look. I make a pattern and cut it from a notecard. I make slits in the Ultrasuede to move it in place. Once I like the way it look, I'll apply adehesive and allow it to dry. When the barrette is dry I replace the spring clip and the barrette is done. |
©1999 Teresa K. Sturnfield
|
|
You Are Visitor |